Sprinkler Repair – Detecting and Fixing Sprinkler Leaks
Maintaining a healthy, green lawn is a top priority for many homeowners. It adds to the curb appeal of a property and helps raise its potential selling price.
Sprinkler Repair Harrisburg PA can fix issues like clogged nozzles, broken sprinkler heads, and faulty watering schedules. Professional irrigation technicians will inspect the system and diagnose the problem.
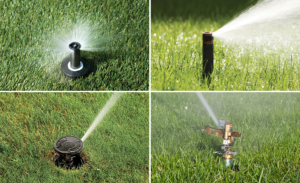
Leaks are one of the most common sprinkler problems. They waste water, decrease system performance, and cause uneven plant coverage. Leaks can be caused by many different things, including clogged nozzles, broken heads, and valve issues. Detecting and fixing leaks is crucial, as they can lead to costly water bills and overwatering.
The most common cause of sprinkler leaks is faulty sprinkler valves. These valves are responsible for controlling the flow of water to each zone in your yard. They can malfunction due to worn solenoids, debris blockage, or other issues that affect their electrical connections. Signs that a valve is going bad include uneven watering, low water pressure in a particular zone, or water continuously leaking from a specific sprinkler head. To fix the issue, turn off the water supply to that zone and disassemble the valve, identifying and replacing the diaphragm.
Another common reason for sprinkler leaks is broken pipes. These can occur for a variety of reasons, such as tree root intrusion or freeze damage in winter. Unlike a clogged pipe, which can often be cleared without digging, broken pipes need to be removed and replaced. When this occurs, it’s best to hire a professional to ensure the job is done properly.
Before making any repairs, it’s important to shut off the water supply to the irrigation system. This prevents excess escape of water during the repair process and helps minimize damage to your landscape. It’s also essential to have the right tools for the job, such as a garden trowel, Phillips screwdriver, pliers, and a bucket. A spare valve diaphragm, Teflon tape, and waterproof wire connectors are helpful as well. Lastly, a good working area is key to performing a successful repair.
Regular preventative maintenance can help keep your sprinkler system running smoothly and efficiently. The first step is to inspect the entire system at least once a year. A quick walk through the yard can reveal a lot of information about your system, including small leaks that may be difficult to notice. It’s also a good idea to monitor water usage, as any changes can indicate a problem.
Broken Pipes
The ground thaws and sprinklers are turned on again in spring, which means water leaks and other issues are more likely to occur. It is easy to find and fix these problems if you know what to look for and have the right tools and supplies. Consistent maintenance will also help prevent these problems and extend the life of your system.
One of the most common and costly sprinkler repair issues is broken underground pipes. The pipes carry water through the irrigation system and provide the necessary pressure to activate sprinkler zones. If you notice puddles or other wet areas in your yard, these are signs of a leak in the pipe. You can also check the system’s pressure with a water pressure gauge.
To locate the break and expose it, first turn off the water supply. Then use a shovel or tubing cutter to dig around the area of the broken line to expose it. Once you have the broken section exposed, cut it off and remove it using a tube cutter. Then use couplings and band clamps to connect the new section of pipe and secure it.
If the pipe is only cracked, you can use duct tape to repair it. Place a piece of duct tape on the side that is damaged, and then put another on the section of the pipe next to it. This will bridge the gap and allow water to flow through unaffected pipe.
For larger breaks, you’ll need to cut off the damaged section of pipe and replace it. This can be a bit tricky because of the underground location, but it is possible. If you have a replacement pipe section, it’s important to cut it the same length as the old one. You can then use a slip coupling to connect the two sections together, and reattach the band clamps.
You can also try heating the pipe with a hand torch to make it more malleable. This can help you get the coupling on more easily. Once the new section of pipe is installed, you can backfill the area and reinstall the lawn grass.
Faulty Electrical Connections
If you’re unable to get your sprinklers to turn on, there may be electrical issues. Always turn off the power to your irrigation system at the circuit breaker before working on it. This will prevent electric shock and possible damage to the system components.
Start with the controller or timer—the brains of the sprinkler system. If it isn’t turning on, check for a blown fuse or a faulty wire connection. Also, make sure the transformer is providing the proper voltage. A multimeter can be used to verify the continuity of the wiring.
Loose or corroded connections can disrupt the flow of electricity to solenoids and zones, impacting the watering schedule and spray pattern for certain areas of the lawn. The best way to avoid these problems is to regularly inspect your irrigation system and use waterproof wire connectors rated for outdoor use.
Sprinkler valves are responsible for sending water from the main line to various regions in the yard. If they are leaking or damaged, it can affect the entire lawn. Oftentimes, you can find signs of valve problems such as dry patches in the yard or uneven water pressure.
Valves can become clogged with dirt, leaves, or debris, which can reduce the flow of water and cause misdirection. You can remove debris and clean clogged heads and filters to restore water flow. You can also install a pressure regulator to maintain balanced and efficient water distribution.
A backflow device prevents contaminated water from returning to your home’s water supply. It can also affect your sprinkler system’s operation, so it is important to routinely check it for problems.
If you have any concerns about your sprinkler system or notice a problem, it’s a good idea to call a professional sprinkler repair technician in Toledo. They can identify and fix the issue, helping you save money on costly repairs. Regular inspections and basic repairs help keep your lawn healthy year-round. These simple steps can help you avoid expensive irrigation repairs and ensure your lawn receives the right amount of moisture. The professional will check the system for leaks, clogged nozzles, and improperly operating zones. They will then repair or replace the necessary components and test the system to ensure it is functioning properly.
Faulty Solenoid
A sprinkler valve solenoid is a plastic piece with electrical wires controlling how much water comes out of the sprinkler system based on the amount of electricity it receives. One broken solenoid could completely stop your entire sprinkler system from working. The good news is that sprinkler valves are relatively easy to troubleshoot and repair if you know what to look for.
The main problem with a valve solenoid is that it can become stuck open or closed. This can prevent the valve from turning on when commanded or from staying on once it is turned on. To fix this, you will need to turn off your sprinklers and locate the faulty solenoid. You can then unscrew it, let water pass through, and test if it is stuck in the open or closed position. If it is still stuck, you will need to disassemble the valve and remove any small rocks or debris from the diaphragm. This should help it close again.
Another common problem is that the solenoid keeps holding back, often as a result of not receiving enough current to trigger its mechanical movements. This can lead to a variety of symptoms including leaks and reduced water pressure.
If you have an ohms meter, you can check whether your valve is getting enough power to activate by connecting the ohms meter to the terminals on the solenoid itself. If the meter reads out of range, it means that the solenoid isn’t receiving sufficient current and should be replaced.
While you should never troubleshoot electricity without proper training, a few things that you can try at home include flipping the circuit breaker switch to see if this makes any difference. You can also clean your solenoid and flush it with water, but any mechanical issues should be handled by a professional.
As with any piece of equipment, your sprinklers will need regular maintenance and inspections to ensure they are functioning properly. This will help you avoid costly repairs and keep your lawn healthy and green throughout the year. If you do experience any problems with your sprinklers, contact a professional to help you get them fixed quickly and easily.
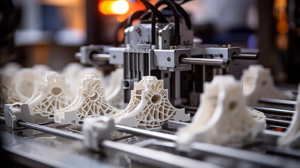
Advantages of 3D Printing
3D Printing allows manufacturing companies to move from a digital design to a physical prototype quickly. This speeds up the production process and can lead to a better quality product.
Businesses can also print spare or replacement parts on demand. This reduces inventory costs and cuts warehousing expenses. Contact 3D Printing Phoenix AZ now!
3D printing costs can be significantly lower than traditional methods when comparing material and production costs. While CNC machining and injection molding require tooling, 3D printers do not and therefore do not have the same overhead.
Furthermore, a number of different 3D printing processes exist, each with their own benefits and drawbacks, so it’s important to select the best technology for your needs. Fused deposition modeling, for example, builds ASA faster than ULTEM 9085 resin and offers a higher resolution, while laser-based processes like Material Jetting offer lower cost parts with better mechanical integrity. Support structures also play a role in determining price, so selecting a design that utilizes fewer supports reduces costs. For instance, choosing a build orientation that saves on ridge-forming layers also cuts costs.
Similarly, reducing the amount of part components can drastically cut overall manufacturing costs. For example, GE reduced the number of parts in their General Electric Catalyst turboprop engine from 845 down to just 11. This helps improve the engine’s performance and durability, while lowering the fuel consumption and carbon emissions that can impact the environment.
Another way that 3D Printing can be more cost-effective than traditional manufacturing is by eliminating the need for customised moulds. This can save time and money by avoiding the long lead times involved in getting tools manufactured.
Compared to subtractive manufacturing techniques, 3D Printing uses less materials due to its layer-by-layer build process. This also makes it possible to create complex geometries that would be impossible or expensive with other production methods. For example, a traditional method of reducing the weight of a product requires removing material from the original block, which often results in excess waste. With additive manufacturing, this is not the case. By adding complexity to a design, the printer can produce lightweight structures that do not sacrifice strength or quality.
Faster
With rapid prototyping and short production times, 3D Printing allows businesses to get their products to market faster than traditional manufacturing methods. In addition, keeping the process in-house can reduce risk and maintain confidentiality for sensitive or proprietary designs.
As a result, the technology has found a place in virtually every industry — including construction and education. For example, architects are using it to construct entire buildings while schools are bringing hands-on learning into the classroom by printing dinosaur bones and robotics parts. 3D printers are also being used in medicine to produce medical models and tools, as well as by manufacturers for jigs and fixtures.
The speed of 3D Printing varies depending on the type of machine and how it’s configured. An industrial fused deposition modeling (3D FDM) printer, for instance, can produce items at speeds of 100 mm per hour while an industrial stereolithography (SLA) 3D printer constructs pieces using liquid resin at up to 500 mm per hour.
Another factor that affects 3D printing speed is the layer thickness and surface finish of an object. Thicker layers take longer to dry, and a smooth surface may require additional post-processing steps.
When it comes to accelerating the 3D printing process, there are several hardware and software adjustments that can be made without compromising print quality or accuracy. For example, reducing the infill of an item can speed up the process while maintaining the strength of the print.
However, it’s important to remember that the trade-off for increasing print speed may be a decreased quality of the final product. It’s important to experiment with different settings and find a balance that meets your specific needs.
Lighter
3D Printing is a manufacturing process that builds up layers of material to create an object. This allows engineers to create objects with complex geometries that would be difficult, if not impossible, to produce using traditional techniques. It also enables them to reduce the weight of their designs without sacrificing strength and durability. This has a huge impact on cost and energy efficiency.
Most 3D printers use a gooey liquid called a resin as their “ink.” Light triggers the resin to harden, creating a new layer every second or so until the object is complete. The resins are often made from plastics or metals. Unlike traditional inks, these liquids can be made with a wide range of materials, making them more versatile. They can even have properties like thermal conduction and magnetism.
The resins used by 3D printers contain photosensitive molecules and dissolved oxygen. Light activates the photosensitive molecules, depleting the oxygen in the printed area. The resulting voxels are then formed by a combination of chemical and physical processes. Increasing the number of voxels printed per time requires more and more light power.
Researchers at Michigan Technological University have developed an ink for 3D printers that could replace epoxies. The ink is a polymeric nanomaterial. The ink contains a combination of polymers, metals and semiconductors. It can print flexible or opaque objects, and it can be used to keep cracks too tiny to see from forming in aeronautical equipment and medical devices. It can even double as electrical wiring.
The ink has the potential to reduce the weight of many products by up to 80 percent. It could also be used to make medical implants and other parts with a high strength-to-weight ratio. It can also improve fuel efficiency and emissions reductions by reducing the weight of aircraft and automotive components.
More Versatile
Unlike traditional manufacturing methods that require a block of material or a mold, 3D Printing builds objects by stacking and fusing layers of raw materials. This allows for more complex geometries and a wider range of materials.
Plastics are one of the most popular printing materials, ranging from low-cost options like PLA to high-performance, tough-to-break ones like carbon fiber composites. These materials are incredibly versatile and ideal for many applications. Metals are also increasingly used in industrial settings for their strength, durability and thermal properties. With processes like direct metal laser sintering (DMLS), selective laser sintering (SLS) and electron beam melting (EBM), metal prints can rival the performance of standard manufactured parts.
Beyond prototyping, the versatility of 3D Printing is enabling organizations to manufacture spare or replacement parts on demand. This eliminates the need for a large inventory and enables companies to reduce overall warehousing costs. It also promotes a more sustainable business model by reducing inventory waste and eliminating the need to ship items across the country or world.
With the rise of personalization and customization, 3D Printing is allowing consumers to design and print products that are made just for them. Whether it’s footwear, jewelry or household goods, the ability to customize these products on-demand is opening up new avenues for businesses to create innovative products and services.
The medical industry is using 3D Printing to produce made-to-measure implants and devices that can be quickly printed from a digital file matched to a patient’s body scan. The automotive industry is also leveraging this technology, from accelerating prototype production to reducing manufacturing times and cost through the use of lightweight materials in vehicles. Other industries are utilizing 3D Printing to create bespoke tools, jigs and fixtures.
Customizable
Unlike traditional manufacturing, which relies on standardized molds to churn out identical products, 3D Printing allows for highly customizable end-use parts. Using materials such as polymer, which can be easily modified, designers can create prototypes with unique shapes that would have been impossible to produce with traditional techniques. This flexibility in design can lead to innovative solutions and a more user-centric product.
It also enables businesses to make changes faster and easier, which reduces design iteration time and saves money. This is why some companies use 3D printers to print end-use parts directly on demand. It also eliminates the need to maintain large inventories and slashes storage costs, while increasing customer satisfaction.
Manufacturers can also customize specialty parts to specific needs. For example, they can build a part with a unique shape to fit into a limited space or make it stronger for its intended purpose. This level of personalization can increase customer engagement, boost brand loyalty, and differentiate a business in a competitive marketplace.
Additionally, 3D Printing is environmentally friendly and can be used to create a wide range of durable and strong materials. It also teaches valuable skills, including iteration, prototyping, and problem-solving. This makes it an ideal tool for education, fostering creativity and helping students develop critical thinking and attention to detail.
Despite its many benefits, 3D Printing is not without its limitations. The technology is still in its early stages, and it may not be suitable for all applications. However, its future looks bright, and its transformative capabilities are transforming the way we manufacture things. In fact, some experts have even coined the term “4th industrial revolution” to describe its impact on how industry manufactures and improves products.
A Guide to Driveway Paving Materials
Having the right information about Driveway Paving can help homeowners save time, money, and stress down the road. This guide to the different types of paving materials for driveways will assist you in choosing the best option for your home and family!
Concrete is one of the most popular choices for new paved surfaces. It’s long-lasting, affordable, and versatile. Contact Driveway Paving Charleston SC now!
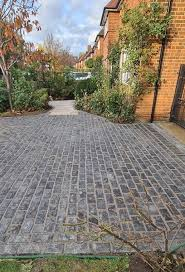
Pavers are a popular choice for driveways and patios due to their durability, flexibility, versatility and aesthetics. They are available in a wide range of sizes, shapes and colors to fit any home style or landscaping design. They also come in a variety of paving materials, such as concrete pavers, brick pavers and natural stone pavers. They can be installed over a base of gravel or sand, which helps them to be permeable and reduce the risk of weed growth.
Driveway pavers are thicker than patio pavers and can withstand the heavy weight of cars and trucks. They can also be laid in different patterns to accommodate the curves and slopes of a driveway. This allows them to withstand the stress of twisting and turning tires as well as the weight of vehicles without cracking or shifting.
If you are interested in installing a paver driveway, it is important to hire a professional installer who has experience with this type of project. The contractor should start by prepping the area for paver installation by creating a base of gravel and sand, which helps prevent weeds and promote drainage. Then the pavers are placed one-by-one in your chosen pattern and sand is added to help them stay in place. A paved driveway is not complete until it is topped with a sealant to protect the surface and keep it looking like new.
The most common option for a driveway paving material is asphalt. This is because it is cost effective and durable, and it can be installed quickly. It is a good option for homeowners who are on a budget but want a stylish and functional driveway. However, asphalt can be prone to cracking under the pressure of vehicles and weather, so it is best to consider other options if possible.
Another popular option is tar & chip, which uses a layer of hot asphalt on the ground and then loose stones are spread over it to create a textured appearance. This is a more affordable option than asphalt paving and is easy to maintain. It is also a great choice for rural driveways, as the loose nature of the chips makes it easier to clear snow and dirt from the road.
Concrete
Concrete is the most popular material for driveways, offering a sleek and customizable look that can boost curb appeal and add value to your home. This material is also extremely durable, able to withstand heavy vehicles and resist cracking over time.
When compared to asphalt, concrete is typically less expensive and is more versatile in terms of design options. You can use a variety of color and texture treatments to create a unique surface that complements your landscape design or architectural style.
The downside to concrete is that it can be susceptible to cracking if not properly installed or maintained. To prevent cracking, your contractor should form expansion joints (grooves) throughout the slab to allow for shifts in temperature and ground movement. In addition to preventing cracking, these joints help minimize random cracking that can detract from the overall appearance of the concrete.
If you’re concerned about the cost of a concrete driveway, keep in mind that it can be made more affordable by choosing a lighter shade or even a recycled product. Lighter colored concrete is also more reflective and can save energy by reducing the heat-island effect.
Concrete is relatively easy to install, although it can be a labor-intensive project for the homeowner. It requires a packed sub-base layer, the construction of wooden forms to hold the liquid concrete, and careful tooling and smoothing once the concrete has set.
In addition, you can choose between a hot mix and cold mix concrete for your driveway. Hot mix concrete is heated before application, which reduces emissions and fuel consumption. Cold mix, on the other hand, does not require heating before applying and is a good choice for patching and repair work.
When considering your paving materials, be sure to think about the load requirements of your vehicle and how often you will be using your driveway. Your paving specialist can help you determine the thickness that will best accommodate these conditions and prevent damage to your vehicle or your pavement. They can also advise you on drainage issues and how to slope your driveway to direct rainwater away from your property.
Asphalt
Asphalt is a common driveway material that can offer several benefits for homeowners. It is a cost-effective option compared to concrete and has a faster installation time. It also provides a smooth, durable surface that can withstand heavy vehicle traffic and weather conditions. Its dark color also helps to hide oil stains and rust spots, making it easy for homeowners to maintain.
Asphalt driveways are less likely to crack than concrete, particularly in freezing temperatures. They are also more flexible, which helps minimize damage from the weight of snowplows and road salt. However, like all paving materials, it requires regular maintenance and repair to extend its lifespan.
An adequately paved driveway can significantly increase a home’s curb appeal, which is a key factor in a potential buyer’s decision-making process. This is especially important in Southern California, where a well-maintained driveway can make your property stand out and increase its value.
To help ensure the longevity of an asphalt driveway, it is critical to understand the underlying causes of damage. While it is not uncommon for asphalt to develop cracks over time, it is possible to prevent these problems by identifying the cause and taking corrective action. These steps include ensuring that the driveway has proper grading and drainage, avoiding excessive heat and sun exposure, and repairing damage early on.
An asphalt driveway that is well-maintained can last up to 20 years before it needs a resurfacing or patching job. In addition, regular sweeping and periodic sealcoating can prevent moisture from damaging the asphalt surface. If you are considering a new driveway surface, be sure to consult with an expert paving contractor for guidance on choosing the right material and a professional paving crew that will ensure your project is completed properly.
Gravel
Gravel is a popular choice for driveways because it is cheap, durable and looks great. It comes in a variety of colors and textures, so homeowners can choose the type that best suits their aesthetic preferences. It is also versatile, as it can be used in different landscape designs and to create drainage solutions. However, there are some important things to keep in mind when choosing gravel for your driveway paving project.
One major consideration is that gravel can easily become dirty if it gets wet, so you will need to spend more time cleaning your driveway. It is also prone to rutting and can be unstable in extreme weather conditions. Additionally, it may be difficult to get rid of ice and snow. Using salt or sand can help, but these products can leave an undesirable stain on your driveway.
Another concern is that gravel can be abrasive, so you will need to use a strong, commercial grade grading machine when installing it. Fortunately, this is not usually a problem for most people, as it will only affect the top layer of the material. However, if you are concerned about the impact on your driveway’s structure, you may want to consider other options for driveway paving.
There is a lot to think about when it comes to driveway paving, and you should always make sure that you are making the right decision for your home. By considering the different options available, you can ensure that your driveway will be safe and comfortable to drive on for years to come. If you have any questions or concerns about the process, be sure to contact a professional for more information.
Drywall Repair Basics
From small dents and abrasions to large holes, any physical damage to drywall will require some form of repair. Often, all that is needed are a few small touches of spackle and a smoothing tool followed by repainting to hide the repair work.

If the damage is more severe, you may need to replace a section of drywall. Getting this right will require some preparation, but it can be done! Contact Drywall Repair Phoenix for professional help.
For minor blemishes like small holes or nail holes, you can often simply apply a touch-up of paint to the area and the damage will disappear. For larger areas, however, a drywall patch kit is often necessary to restore the wall’s appearance. In either case, it is important to properly prepare for the repair and have the proper tools available to ensure a quality job.
A few key items to have on hand for drywall patching are a stud finder and a carpenter’s square. A stud finder will help you locate the center of the nearest stud to the damaged area, while a carpenter’s square will help you mark a straight line to follow with your drywall saw. Once you’ve marked the line, cut it with your drywall saw to create a square hole that is at least an inch wide.
Next, use a wire mesh patch to cover the hole. Attach the patch to the wall with a putty knife and fill it with spackle or joint compound. Apply multiple layers, allowing each layer to dry completely before applying the next. Be sure to feather the edges to help the patch blend in with the rest of the wall.
Finally, finish the patch with a few light coats of drywall compound and sand it down once again, being careful not to go too far into the corner bead. Once the patch is sanded, you’ll be ready to prime and paint.
For dents or scratches in the drywall, you can usually simply apply a few layers of drywall compound and smear it to make it flush with the wall. Be sure to smooth the compound with a putty knife designed for drywall, as it’s much easier than using wood putty on the surface.
Larger dents or holes in drywall can be more difficult to fix, but it’s definitely possible. You’ll just need to prep differently. Start by cutting a piece of new drywall that’s a few inches bigger than the hole. Place it over the hole and trace it lightly with a pen or pencil.
Crack Repair
A drywall crack is a common problem that can occur in almost any home. Drywall is a sturdy material, but the stresses of life can cause it to develop a hairline crack that needs to be repaired quickly to prevent it from worsening.
There are several ways to fix a drywall crack, depending on the size and severity of the crack. For small cracks, you can use a drywall patch kit to fill in the crack and blend it into the existing wall. This is a quick and easy solution that will make the damage practically invisible when it’s finished.
Larger cracks will require a bit more work to repair. First, you will need to clean the area around the crack and remove any dust or debris that has accumulated. This will help the drywall compound adhere properly. Once the area is ready, you will need to sand the drywall surface smooth and apply a new coat of drywall compound. After the new drywall compound has dried, you will need to sand it again to get it completely smooth.
If the crack is at a seam, you can use a utility knife to widen the gap between the drywall sheets where the crack appears (Image 1). Then, you can fill the crack with a thin layer of spackle and smooth it out using a putty knife. You can also cover the crack with self-adhesive fiberglass drywall tape to strengthen the joint and prevent future cracks.
If you have a larger crack, you will need to construct a new piece of drywall to replace the damaged section (Image 2). This requires a little more construction than just filling in a hole. You will need to cut a piece of drywall to the size of the damaged section and install it on the wall. This will require a drywall saw and some skill.
It’s important to carefully measure the length and width of the damaged drywall before cutting it out. It’s also a good idea to trace the new piece of drywall onto the old drywall before cutting so you can ensure that the patch will be the right size when it’s finished.
Patching Large Areas
While minor holes and nail pops are relatively easy to patch, larger areas require a more in-depth repair procedure. It’s important that the drywall repair addresses the root cause of the problem so it doesn’t happen again. For example, a small hole or crack might indicate slight settling or moisture damage, while larger areas may suggest structural issues.
For drywall repairs in these larger areas, you’ll need a drywall patch kit that includes all the necessary tools and materials for the job. The first step in this process is to remove any loose and damaged materials around the area, then clean the wall and prep it for new drywall. Once the surface is ready, you’ll need to add a backing board (often a scrap piece of lumber cut about 2-4 inches longer than the patch) so the patch can be screwed into it.
Once you’ve added the backing, you can measure and cut a piece of drywall to fit the hole. Once it’s cut, you can use a drywall knife to smooth the edges and apply joint tape. Once the joint tape is in place, you can apply a coat of drywall compound. Let the drywall compound dry and sand it smooth before painting.
It’s also a good idea to prime the patched area before repainting. This will help ensure the new paint adheres and helps the patch blend in with the existing surface.
Depending on the severity of the damage, you may want to call in a professional drywall contractor to help with the job. Large areas and extensive damage can be tricky to repair and it’s often better to leave these types of projects to the professionals.
If you’re in the market for a quality drywall service, contact Sierra View. Our team of experienced technicians can handle any drywall repair or replacement job that you have, large or small. Get a quote from us online today or call us at 801-895-8177 to learn more about our services. We’re proud to offer competitive pricing and outstanding customer service!
Drywall Replacement
Drywall is a versatile building material that can be used to create walls and ceilings. Known by many names, including plasterboard and gypsum board, it is an important component of homes and buildings. It’s a cost-effective and easy way to construct interior walls, and it provides a durable surface that can be painted. Like any building material, drywall is susceptible to damage over time. Cracks, dents and other imperfections can occur due to structural settling or moisture infiltration, and they can detract from the aesthetic appeal of a space. Depending on the severity of the damage, drywall repair may be a simple DIY project or require the services of a professional.
Dry wall repair begins with assessing the extent of the damage and determining what tools and materials are needed to make the necessary repairs. For small holes and dings, you can use spackle or joint compound (also called “mud”) to fill in the blemishes. To prevent future drywall damage, it is important to inspect your walls regularly and to address any issues as soon as possible. Other preventive measures include regular painting and maintaining proper humidity levels to keep drywall mold-free.
A drywall patch kit includes all the tools you need to complete small drywall repairs, including a stud finder, carpenter’s square and a utility knife. Once you have the necessary materials, follow the instructions in the patch kit to prepare the area for a repair. First, use the stud finder to locate the center of the nearest stud on either side of the hole, and mark it with a pencil. Next, cut away the damaged area of drywall with the utility knife, using care to not disturb the surrounding drywall.
Once the area is prepared, apply a thin layer of spackle or joint compound to the patch and surrounding areas. Smooth the patch, and feather the edges of the patch into the existing wall to ensure a seamless blend. Once the patch has dried, sand until it is smooth and ready for paint.
While repairing minor dents and holes in drywall is relatively straightforward, larger holes or patches can be more complex. In these cases, it is often best to leave the work to a professional. Professionals can not only repair the damaged drywall, but they can also identify and correct any problems that might be causing the drywall to deteriorate.