The Importance of Gutter Cleaning
Gutters are a vital part of your roof’s drainage system, protecting your home from expensive water damages. Regular gutter cleaning keeps them clog free and functioning optimally.

It is recommended that you clean your gutters at least twice a year in the fall and spring. During this time you can also inspect them for any wear and tear or damage. Discover More About Us by reading the article below.
Clogged gutters overflow and cause water damage, reducing the lifespan of your roof, walls, and foundation. By scheduling regular gutter cleaning services, you can ensure that rainwater is properly directed away from your home, minimizing risks and preventing costly repairs.
When left unchecked, clogged gutters can cause water to seep under roof shingles, causing rot and compromising the integrity of the structure. It can also seep into exterior walls, resulting in wood rot and mold growth that can cause paint to peel and drywall to deteriorate. This can cause costly and disruptive repair bills as well as a reduction in the overall value of your property.
Standing water in clogged gutters creates the perfect environment for mold and mildew to thrive, threatening the health of your family. It can also cause rust and corrosion of your gutter system, reducing their effectiveness and lifespan.
If clogged gutters overflow, they can also cause erosion around the foundation of your home, leading to cracks and structural instability. This can cost thousands of dollars in repairs and may compromise the safety and integrity of your home.
Gutters filled with leaves, twigs, and other organic debris can attract mosquitoes, rodents, birds, and other pests. These pests are attracted to the moist and dark environments created by clogged gutters and can infiltrate your home, posing serious health and structural risks. Regular gutter cleaning eliminates the conditions that attract pests, preventing them from invading your space.
Keeping your gutters clean protects your investment in landscaping, as well. Overflowing gutters can wash away mulch, gravel, and other landscape materials, causing them to degrade over time. This can result in costly replacements and reduce the beauty of your landscape. Clean gutters allow you to enjoy the benefits of your landscaping without having to worry about erosion and damage to your foundation or walls.
Mold and Mildew
Keeping your gutters clean can help prevent the growth of mold, mildew and other unsightly stains. Keeping them free of debris will also allow for proper ventilation, which is important for your health and safety. Mold and mildew thrive in humid, dark environments, which is why clogged gutters are the perfect environment for them to grow. They can release spores into the air that cause respiratory problems for homeowners and their families. Additionally, if the spores come into contact with your skin or eyes, it can lead to severe irritation and allergic reactions.
Mold and mildew can deteriorate the gutters themselves, leading to the need for replacement. Additionally, they can also cause wood damage and rot around the home’s foundation. This can lead to a wide variety of issues, including cracks in the foundation and wall, soil erosion, and a compromised structure. Gutter cleaning can help prevent these issues by ensuring that rainwater is properly channeled away from the house, preventing moisture buildup in and around the foundation.
Proper gutter drainage can reduce the risk of roof damage and increase the lifespan of your roofing materials. In addition, proper gutter maintenance will ensure that water is not pooling in areas where it can seep under and warp shingles.
Regular gutter cleaning will also prevent the accumulation of leaves, twigs, and other debris, which can clog downspouts and cause overflowing. Additionally, this process will keep pests, such as ants, mosquitoes, rodents, and other unwanted creatures from infesting your property.
Keeping your gutters clean can be easy with the right equipment and knowledge. Using a soft-bristled brush or sponge can help you remove any debris from the surface of your gutters without scratching it, while a garden hose can rinse off remaining dirt and grime. It is recommended to use a mildew-fighting, bleach-based cleaner for removing any moss or mildew that has grown on your gutters, as it will kill the fungus and prevent it from coming back. It is also recommended to wear protective gear, such as gloves, a dust mask, and goggles, to avoid any allergic reactions or eye irritation caused by the cleaning solution or debris.
Pest Infestation
When gutters are clogged, they create stagnant water environments that promote pest infestation. Mosquitoes, rodents, ants, and other pests love to nest in moist, dark places like clogged gutters. When these pests find shelter in your home, they may bring along a host of health risks for family members. For example, mosquitoes spread diseases such as West Nile virus and Zika. Rodents also spread pathogens and damage property when they enter homes in search of food, water, and shelter.
Gutter cleaning services ensure the smooth flow of rainwater around your house and protect your home’s foundation from water damage. In addition, regular maintenance helps to protect your property’s curb appeal and enhances its overall value.
Gutters that are clogged with debris can cause a host of problems that are costly to fix and even threaten the structural integrity of your home. Water that overflows from clogged gutters seeps into the foundation of your home and can lead to cracks and crumbling, which require expensive repairs. In addition, when water isn’t properly redirected away from your home, it can cause erosion and wash away landscaping materials, which will need to be replaced.
Gutter maintenance services keep the water flowing freely and prevent clogging, preventing the need for costly repair and replacement costs. In addition, regular maintenance keeps your gutters safe from rusting and decay, extending their lifespan.
Home Value
Gutter cleaning may be an unsung home maintenance hero, but it’s a critical step to protecting your home and increasing its value. Homeowners who neglect gutters set themselves up for costly repairs – and water damage is one of the biggest deterrents to home buyers.
Grateful homeowners who keep their gutters clean reap a big benefit when it’s time to sell. Clean gutters increase curb appeal and give the house a polished, attractive appearance. This is a simple and affordable way to enhance the beauty of your home and make it more appealing to potential buyers.
Aside from curb appeal, clean gutters protect the roof and siding of the house, increasing its lifespan. It’s also important to maintain your gutters to avoid the risk of leaks and foundation issues. Regular professional gutter cleaning prevents these issues, so you don’t have to spend thousands on repairs down the road.
Gutter systems should be cleaned at least twice a year, in spring and fall when leaves and debris are most likely to accumulate. Homes surrounded by large trees may need more frequent cleanings.
Professionals also inspect the entire gutter system, checking everything from downspouts to fascia boards, ensuring they’re properly pitched and installed. They’ll check for signs of wear, like rust and sagging, and catch slope problems early – preventing water pooling disasters later. They’ll also extend the life of your gutters, preventing them from needing replacement before they’re ready.
When choosing a gutter cleaning service, it’s important to find out how long the company has been in business. A reputable company will have extensive experience and a proven track record. It’s also a good idea to look for online reviews, as they can help you determine the best provider for your specific needs. Compare quotes to ensure you’re getting a fair price for the work required. Be sure to consider labor, materials, and any extra charges, such as climbing equipment or cleaning supplies. A reputable company will provide detailed quotes and disclose all costs upfront to make the process as easy as possible for you.
The Difference Between On-Page Optimization and Off-Page Optimization
The headline of your article is often the first impression that a potential reader will have of your content. Therefore, it is important to take your time crafting a compelling and informative headline.

Link building is one of the most valuable SEO strategies. However, it is challenging to master because it relies on other websites to provide you with a link. Contact Rank Boss for professional help.
On-page optimization refers to the actions that SEO professionals can control on their websites, such as updating metadata (title and description tags), ensuring SEO-Friendly URLs, and optimizing internal links. It is also the process of identifying relevant keywords for which your website should rank, and ensuring that your content is properly optimized to target those keywords.
Title tags are an important aspect of on-page optimization, as they are the clickable titles that appear in search engine results pages (SERPs). They should be unique, descriptive, and include your targeted keyword, while keeping the user experience in mind. In addition, on-page optimization includes using keyword placement throughout your web page copy, meta tags, and headers. It is also crucial to create a robust internal linking structure, which will help search engines crawl your site more effectively and will allow you to distribute SEO juice between pages.
Search engines are constantly evolving their algorithms to ensure that they provide quality and relevant results for users. This means that what worked as an effective strategy in the past may no longer be successful now. For example, backlinks used to be the most important factor for a website’s ranking, but now they must come from a high-quality domain and be contextually relevant to your niche.
Aside from making sure your website contains quality on-page optimization, it is also essential to monitor your website’s performance. Tools like Google Analytics and Google Search Console will show you the progress of your on-page optimization efforts, allowing you to see how well your strategy is working.
Off-page optimization, on the other hand, involves the actionable strategies that are conducted off-site to improve your ranking. Backlinks remain the most important off-page SEO tactic, but other strategies can also be effective, such as finding broken links on competitor sites and pitching to them to replace them with a link to your site.
Another key off-page SEO technique is promoting your brand on social media. This can increase your brand’s visibility, which will in turn generate more organic traffic and improve your ranking.
The most important off-page SEO strategy is to develop valuable content that your audience wants to read and share. This will not only improve your SEO, but it will also make people more likely to interact with and engage with your brand. In a world where social media is king, this is an essential way to grow your business. This is why it is so important to have a comprehensive social media strategy that encompasses all aspects of your business. A good social media strategy will incorporate all of your marketing channels and be aimed at driving customer acquisition, retention, and engagement. It will also integrate with your other digital marketing strategies, such as email, PPC, and SEO. This will allow you to optimize your efforts across all channels and maximize your return on investment. By focusing on quality over quantity, following best practices, and maintaining rigorous risk management practices, you can successfully build your off-page SEO campaign.
Off-Page Optimization
Unlike on-page optimization, which focuses on optimizing the content of your website from the inside out, off-page optimization (OPO) consists of strategies and techniques that are used to enhance your site’s visibility in the search engine results page without directly editing its content. This is typically achieved through the use of backlinks, which are links to your website from other websites. OPO is a critical part of SEO because it allows you to promote your website to a wider audience and improve its ranking by increasing its authority and credibility.
While some marketers may mistakenly associate OPO with link building, it actually encompasses many different activities and is a key component of any digital marketing strategy. To build quality backlinks, you must create valuable and shareable content that others will want to link to. This includes blog posts, infographics, and videos. To optimize your content, ensure that it is informative and answers frequently asked questions. Additionally, you can leverage social media and influencer marketing to promote your content and gain additional backlinks.
When executing OPO, it is important to follow best practices and avoid any tactics that are deemed spammy by search engines. For example, attempting to manipulate your ranking through link buying or submitting your website to link directories is considered spammy and can result in a penalty from Google.
To improve your off-page optimization, you should regularly monitor and analyze your metrics. This will allow you to identify trends and patterns that may be impacting your performance, allowing you to make necessary adjustments. Additionally, tracking and analyzing your off-page data will help you understand what types of off-page activities are most effective in boosting your ranking.
One of the most effective off-page optimization strategies is to guest blog on other websites in your industry. This is an excellent way to reach a wider audience, generate backlinks, and establish yourself as a subject matter expert. However, you must be careful when selecting the sites you want to guest blog for. Ensure that the website has a high domain authority and is relevant to your industry.
Creating original, engaging content that is highly shareable is another effective way to improve your off-page optimization. This includes blog posts, infographics, video content, and eBooks. While generating valuable content is a great way to attract natural backlinks, you can also enhance your off-page optimization by using other methods such as social media marketing, influencer outreach, and online PR.
While achieving high off-page optimization is critical to your search engine rankings, it is important to keep in mind that you can never stop trying to improve your ranking. By continuing to experiment with new strategies, you can achieve the best results possible for your business.
While there are countless off-page optimization techniques, the best approach is to use a combination of several techniques. This will help you maximize your results and ensure that your campaign is running smoothly. By following these tips, you can increase your site’s visibility and rank higher in the search engine results page.
Transform Your Kitchen on a Budget With Cabinet Refacing
If you’re in the market for a kitchen makeover, but don’t want to deal with the mess and price tag of a full remodel, consider cabinet refacing. It’s an affordable, high-impact upgrade that gives you a stunning new look in days, not weeks. Cabinet refacing involves replacing the doors and drawer fronts, while covering the existing cabinet boxes with a veneer. You can choose from a variety of materials, including wood, thermofoil, or laminate.

1. Cost-Effective
Sacramento Cabinet Refacing is significantly more cost-effective than installing new cabinets or doing a full kitchen remodel. This is because it preserves existing structures, eliminates waste from the demolition process, and allows for customization of colors, styles, and finishes without the high-end price tag of traditional remodeling projects.
The refacing process involves inspecting and preparing existing cabinet boxes, then replacing the old doors and drawer fronts with customized options. Your design team will help you select the materials, hardware, and finishing touches to create a look that suits your taste and functional needs. The result is a beautiful and modern kitchen without the disruption and expense of a full renovation project.
Depending on the complexity of your project, the refacing work can be completed in 1-3 days. Refacing is also a more budget-friendly option than painting, as it focuses only on the cabinet doors and drawer fronts, leaving the cabinet frames and boxes untouched. However, it still offers a high level of customization.
Aside from the obvious cost-savings, cabinet refacing is an eco-friendly option. By utilizing the existing cabinet framework, you cut down on unnecessary waste and prevent MDF (medium-density fiberboard) material from ending up in landfills.
Upgrading your cabinetry can also boost your home’s resale value and increase its appeal to prospective buyers. A stylish, modern kitchen is a major selling point that many homeowners desire. This upgrade is ideal for a well-functioning kitchen that simply needs a facelift. By prioritizing quality materials, seeking expert design advice, focusing on finish excellence, incorporating eye-catching details and hardware, leveraging effective lighting, and balancing budget allies with upscale upgrades, it is possible to achieve a luxurious kitchen makeover that doesn’t break the bank.
2. Versatile
Homeowners seeking a dramatic kitchen makeover on a budget can transform their cabinets with refacing, a cabinet update that offers high durability and a fresh new look. Unlike a complete kitchen remodel, cabinet refacing maintains the existing cabinet boxes while replacing the doors and drawer fronts, giving your home a like-new appearance.
This method of kitchen upgrade offers a wide range of styles and materials to suit any taste. For example, homeowners can choose from natural woods with grained finishes or durable laminates to give their homes a modern design. They can also select from Rigid Thermofoil (RTF) options that offer longevity and ease of maintenance. In addition, homeowners can choose from a variety of door style options to create a custom aesthetic.
The refacing process can be completed in just weeks, so it’s less disruptive than a full kitchen remodel. It’s also less expensive than a complete replacement, making it an excellent option for homeowners on a tight budget. The result is a beautiful, updated kitchen that adds to the value of your home without the expensive price tag and lengthy remodeling timeline of a full renovation.
Choosing the right material for your cabinet doors is key to creating a stunning kitchen that complements your style. For example, refacing with walnut wood is an elegant, timeless choice that will enhance your home’s beauty and elevate the sophistication of your kitchen. You can also add a contemporary touch by upgrading your hardware to sleek, modern knobs or handles.
3. Aesthetically Pleasing
Cabinet refacing is an excellent way to revitalize your kitchen’s aesthetic without investing in a complete renovation. By covering existing cabinet doors and drawer fronts with a veneer, homeowners can choose from an extensive array of styles, materials, and finishes to create the perfect design for their space. Cabinet refacing can also be customized to accommodate specific kitchen functions, from optimizing storage and work space to highlighting decorative features.
The result is a sleek, modern kitchen that can elevate the overall appeal of your home and increase its resale value. In addition, a well-maintained and updated kitchen can be the deciding factor for many potential buyers when choosing a new home.
As an added benefit, refacing your cabinets is a much less labor-intensive process than installing new cabinetry. This allows you to enjoy a fresh kitchen in a fraction of the time, minimizing downtime and disruption in your home. It also prevents perfectly usable material from ending up in landfills, making it a more environmentally conscious option.
The key to a successful cabinet refacing project is accurate measurements. Eyeballing your cabinet sizes isn’t enough — even a half-inch of misjudged space can throw off door alignment and leave you with a kitchen that looks more like a tilted funhouse than a modern, chic space. To avoid these pitfalls, it’s important to work with experienced, professional remodeling experts to measure and record all cabinet elements to ensure the correct dimensions for your new door and panel overlay.
While refacing is an excellent solution for many kitchens, it does have limitations. It’s important to note that refacing doesn’t address significant structural changes or repair work and may not be the best option for homes with outdated or damaged cabinets. If you’re looking to make a more comprehensive change, replacing your cabinets with new doors and drawers may be a better choice for your remodel.
4. Long-Lasting
Cabinet refacing is more durable than painting and has the potential to last for decades. When done correctly by qualified carpenters, it can enhance the beauty and functionality of your kitchen for years to come. It also helps protect your investment by keeping your cabinets looking like-new for a fraction of the cost of a full remodel.
The cabinet refacing process involves replacing the existing cabinet doors and drawer fronts as well as applying a veneer or laminate to the visible parts of your cabinet boxes. The old cabinets are carefully removed and the surfaces are then cleaned and sanded to ensure proper adhesion of the new material. The result is a cohesive, polished look that complements other elements in your kitchen.
Refacing isn’t a DIY project, but a professional kitchen refacer will work with you to select the best materials and colors to create your vision for a completely revamped kitchen. They will offer a variety of hardware options to further customize your new look, and their experienced team can even add custom features like glass inserts.
While refacing isn’t a suitable solution for cabinets with structural damage or poor quality, it can be an excellent option for boosting home value and making your space more appealing without the high price tag of a complete renovation. In fact, it is the ideal choice for homeowners who want to refine a style or try out a trendy look that would be difficult to pull off with a paint job.
If you’re interested in upgrading your kitchen with a fresh, new look that’s more durable than paint and less costly than a full cabinet replacement, give your local Kitchen Tune-Up a call today!
5. Easy to Maintain
Cabinet refacing is a great choice for upgrading your kitchen without spending a fortune. By choosing high-quality materials, your new kitchen will last for years to come. When you team up with a professional, they will help you select from custom, semi-custom, or stock doors to create the perfect look for your kitchen. They can also offer tips on how to properly maintain your cabinets to keep them looking great for years to come.
Unlike replacing cabinets, refacing leaves your current cabinet boxes in place and covers them with laminate or wood veneers to give the space a facelift. This saves on installation costs and time. You can choose from a variety of colors and textures for your cabinets, as well as hardware to match. Cabinet refacing is also a green option since it allows you to reuse your existing cabinet boxes, cutting down on waste and landfill contributions.
In addition to changing the appearance of your cabinets, refacing can also make minor changes in layout. It’s an ideal solution if your cabinet boxes are still structurally sound and you’re happy with their design, but the doors have become outdated. However, it’s important to note that cabinet refacing won’t solve layout problems and may not be the right fit if you’re planning to relocate your appliances.
Adding a microwave over your stove, creating more room for a fridge, or enclosing your pantry like a built-in could require a full remodel with all-new cabinetry. The refacing teams at American Wood Reface can be your partner in these types of projects, providing expert carpentry skills to modify your cabinet layout and reinstall the new doors and drawer fronts. They can also install new trim pieces to give your cabinets a finished look.
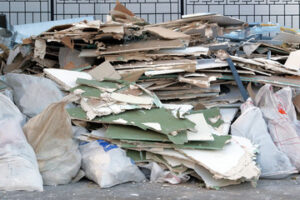
The Hidden Psychology Behind Junk Removal and What It Reveals About You
Junk Removal Hemet is more than just throwing things away. It touches on emotions, habits, and hidden beliefs. When people let go of items, they let go of something deeper. This process can quietly reveal how we view ourselves and our surroundings.
People don’t usually think about how clutter impacts their mindset. They focus on the visible mess, not the mental one. But letting go of junk brings mental relief too. It’s like a soft reboot for your inner world.
Some people hold onto objects because they link them to memories. Others fear they might need them later. These fears can grow silently, filling garages and drawers. Junk then becomes more than junk—it becomes an anchor.
Removing that anchor can spark unexpected emotions. Some feel guilt, shame, or anxiety during the process. These feelings stem from attachment and personal identity. People connect objects with who they were or hoped to be.
In reality, most of the items we store have lost their purpose. That box of wires from an old device no longer helps us. But it stays because of imagined utility. We fear being unprepared or wasteful.
This behavior reflects how we relate to control and security. Junk can serve as a safety net for “what ifs.” But too much of it causes stress and physical strain. Homes should support our lives, not weigh them down.
People are becoming more aware of space and energy. They realize that crowded rooms affect sleep and focus. They see how excess distracts them from what matters. That shift in mindset changes everything.
Junk removal becomes a form of self-respect. When you clean out a space, you say, “I deserve peace.” It’s a simple but strong message to yourself. A clean space reminds you that you are in charge.
Some now treat junk removal as a life strategy. They use it to reset after breakups, job losses, or big changes. It’s their way of saying goodbye and starting fresh. The act becomes symbolic and healing.
Still, junk removal is not always easy or fast. For some, it takes several rounds. Others need outside help to stay objective. They get stuck in “maybe someday” thinking.
Digital clutter is the next layer people are dealing with. Photos, downloads, and files also pile up silently. These take less physical space but more mental bandwidth. Clearing a digital folder can feel just as freeing as clearing a closet.
Another growing idea is emotional hoarding. People keep items tied to unprocessed grief or regret. That sweater from an ex or old gifts from the past carry weight. When these are removed, people often feel a shift inside.
Some choose to document items before letting them go. A photo helps preserve the memory without keeping the thing. This method eases the goodbye process. It also helps honor the item’s story without staying stuck.
Younger generations are approaching junk differently. They prioritize experiences over possessions. They move more often and own less. This fluid lifestyle encourages routine purging.
However, junk is evolving too. Today’s junk often includes fast fashion, outdated gadgets, and expired self-care products. These modern items add to clutter quicker. People need to be more mindful of what they bring in.
Some are turning to “junk rituals” to make removal special. They light candles, play music, or journal while decluttering. This adds meaning to the process. It becomes a sacred act rather than a chore.
There’s also a connection between junk and self-image. People with low self-worth may let clutter build as a form of neglect. In contrast, organized spaces reflect a sense of pride. This creates a feedback loop of care.
Those in healing stages often find junk removal empowering. It gives them a sense of progress. As they discard things, they reclaim emotional territory. The space becomes theirs again.
Many believe junk attracts more junk. A messy corner invites more mess. This is called the “clutter magnet effect.” It’s real and often happens without noticing.
There’s also the invisible cost of clutter. It takes time to clean around it. It causes tension during visits. And it blocks spontaneous moments of peace.
People who remove junk often report better sleep. Their minds feel calmer without background chaos. The brain processes less input. Clean spaces allow deeper rest.
Over time, people realize junk is not just stuff—it’s delayed decisions. Every object represents a choice postponed. Junk accumulates when people avoid those choices. Removing it means finally choosing.
Some junk removal efforts lead to identity shifts. A person may realize they’re no longer a gamer, hobbyist, or collector. This can be painful but also clarifying. Letting go affirms who they are now.
Children can learn from junk removal too. Teaching them to sort, donate, and recycle builds awareness. It shows them that not all things are forever. They learn values through simple acts.
There’s a rising trend of minimalist challenges. People take on 30-day decluttering games. They remove one item the first day, two the next, and so on. These playful approaches make the process less overwhelming.
People are also learning that junk doesn’t have to go to waste. Repurposing and rehoming are gaining traction. This adds a layer of purpose to the act. Giving items new life feels better than discarding.
Those who journal their removal journey often find deeper insights. They see patterns in what they keep and why. This self-study builds emotional intelligence. It turns decluttering into discovery.
Sometimes, removing junk leads to family discussions. People find shared items they forgot existed. They revisit memories, laugh, cry, and bond. The process reconnects them beyond material things.
Seasonal cleanouts are becoming rituals in some households. They follow the rhythms of nature—spring, fall, and year-end purging. These moments become times of reflection. People align their inner and outer spaces.
People in transitional phases often crave less. Graduates, retirees, new parents—each faces life shifts. They seek spaces that reflect their new chapter. Junk removal becomes part of the transformation.
Sustainable living advocates see junk removal as the first step. It makes room for conscious consumption. When you see the excess, you think twice before buying. This leads to slower, smarter living.
Emotional health professionals now link clutter to anxiety. They recommend gentle removal as part of therapy. Clients feel lighter with each discarded item. It’s a small but powerful tool in healing.
People also forget that junk includes gifts they never liked. Letting go of these doesn’t mean rejecting the giver. It means honoring your space. Boundaries matter even in material things.
Removing junk allows homes to breathe. Air flows better, light spreads easier, energy feels brighter. These effects are subtle but strong. The space becomes a source of comfort again.
Some people remove junk in silence for clarity. Others prefer music for motivation. Either way, the act becomes meditative. It slows the mind and centers the heart.
Clutter can block creativity. A full desk often leads to mental fog. Artists, writers, and creators thrive in open space. Clearing junk can spark new ideas.
People in relationships sometimes face conflict over clutter. One sees value; the other sees mess. Communication is key here. Junk becomes a shared decision, not a silent battle.
Digital junk, such as old emails or saved memes, also needs pruning. They weigh on our digital minds. A clean inbox can feel like a fresh start. It boosts mental clarity and reduces stress.
Some people host junk swap parties. They exchange unused items with friends. This turns removal into a social experience. It makes the process more fun and less lonely.
When people see the final result, they rarely miss the things. Instead, they celebrate the space. The shift in energy is unmistakable. Relief replaces resistance.
Junk removal has become a form of self-awareness. It teaches boundaries, priorities, and release. What we keep says a lot about us. What we let go of says even more.
The act of clearing junk holds surprising depth. It’s not just physical labor—it’s emotional labor too. People don’t just remove things; they rewrite their story. And that story often leads to peace, freedom, and renewal.
Framing and Deck Building
Building a deck adds outdoor living space and increases home value. It’s also a major undertaking.

Dig the footings, install posts and attach beams to form the foundation of the deck. Install joists and rim joists as per the manufacturer’s instructions, using metal joist hangers. Contact Deck Builders Lexington KY for professional help.
Use care to make sure the deck-to-wall connection is sealed tightly. Gaps allow water, snow and carpenter ants to invade the structure and cause damage.
Posts and beams are the foundation of any deck, transferring the weight of the structure to concrete footings that are sunk into the ground. The larger the deck, the more weight it must be able to support, and therefore the bigger the posts and beams must be. Posts are typically made from pressure-treated lumber.
Beams are built up from multiple pieces of 2 x 6 lumber to create a stronger and more durable structure. You can use pre-fabricated beams if you are working with an existing deck and have a limited budget, but if you’re building from scratch it is more cost-effective to use rough sawn pressure treated lumber for the framing.
Choosing the right size of beams and posts is an important part of the overall design of your deck, and requires some careful load calculations. The International Residential Code (IRC) provides basic guidelines for these calculations, but your local building authority may have its own version of the code. Ask your local building department for a copy of the code, or look online for a cheat sheet to help you identify the key variables.
To prevent the footings from sinking too far into the ground, they should be set a minimum of 6 feet apart. The footings also need to be set below the frost line, which varies by region. A footer calculator is available on our website to help you determine the number of concrete footers you will need.
Once you’ve determined the size of the footings and posts, it is time to install them. First, you must dig holes and pour the footings to a depth at least as deep as the height of the deck posts. This will ensure that the structure is not too close to the house and will be able to withstand any future expansion and contraction of the soil around it.
Then you must mount the deck posts. For a single-level deck, you can use 4×4 posts, but for higher multi-level structures, you must use 6×6 posts. If you are using 6×6 posts, make sure you have enough in stock to cover your entire deck. When installing the posts, use through bolts that pass through both the post and the beam, rather than lag bolts, which can loosen over time and leave the posts and beams vulnerable to damage.
Joists
Deck joists are the framework for your deck, and they have an impact on more than just how the deck looks. They also affect how long the deck will last and how well it will hold up to the elements and use. Choosing the right materials and properly installing the joists are key to building a sturdy, durable deck. The joists must be strong enough to support your deck’s live and static loads, so make sure you choose lumber with adequate strength ratings. You should also check your local building codes to ensure you are using the correct joist size for your deck’s dimensions.
The most common joist sizes are 2 x 6s through 2 x 10s. You can also purchase pre-cut joists to save time. Joists should be pressure treated for protection from the elements.
Use a level and chalk line to mark straight lines for joist placement. Joists should be spaced no more than 8 feet apart to prevent bending and twisting under load. If you encounter any obstacles that are in the way of a joist, frame around them to keep the joists evenly spaced. For example, if a wall or fence posts are in the path of one of your deck joists, install ledger pieces on either side of the obstacle and install joists on both sides of the obstruction. If the joists are to be joined together with a header, cut and install a piece of blocking between the joists.
For longer joists, you may need to install solid blocking to prevent the joists from twisting under heavy loads. This is especially important if you are using 2x10s or taller joists. Blocking is typically just short boards that are cut to the same length as your joists. The blocking should be placed between the joists and attached with nails or screws.
If you are using 2x10s for joists, consider skipping the center beam and going to 20 ft joists instead of 16 ft. This will allow you to get the bearing you need without a center beam. 2x12s can span 16′-6″ at 16 oc and have a maximum cantilever of 4′.
Ledger Board
The ledger board connects the deck to the house and transfers much of the deck’s load to the foundation. It is crucial that it be a good fit and well fastened to the house. If it isn’t, the deck can eventually rot and fail. The ledger should be secured to the rim joist or band joist of the house.
Many newer houses use engineered lumber instead of standard 2x lumber as rim joists and band joists. When using this type of lumber it is necessary to follow the manufacturer’s instructions for attaching a ledger board to it. These will usually require a special spacer to be used between the sheathing and the rim joist in order to avoid over tightening the ledger board which can pull the house sheathing and framing together and cause leaks.
Another option for securing a ledger is to use metal flashing. This creates a dry air space between the house sheathing and the ledger which will extend the life of both. This is especially important in wet climates where moisture can quickly cause wood rot.
Rigid flashing can be screwed to the sheathing or lag bolted to it. This method is less expensive than a special spacer but still provides a strong and durable connection. It is often recommended by the manufacturers of the flashing and is required in some areas.
Depending on where you live, your local codes may require specific minimum and maximum lag bolt spacing configurations for the ledger board. This is a very important factor to consider when installing a deck as it can be extremely dangerous for a homeowner to attempt to install a deck that does not meet code requirements and is unsafe for a family to use.
If the deck is to be built over an existing foundation it can be a very challenging task to securely attach the ledger to the concrete. If this is a project you intend to undertake it is best to build the deck while the house is being constructed so that the ledger connections are installed at a very early stage of construction. This will make it easier to ensure the proper connection is made.
Framing
A deck can add outdoor living space to your home and increase its value. Building a deck requires an understanding of construction methods, including framing. You will need to plan the layout of your deck, lay a foundation, construct the frame and then install surface decking. You will also need to consider stairways and railings, depending on how high your deck is off the ground. The decking itself may be made of wood or a synthetic material.
The footings and posts that form the base of your deck will be set below the frost line — the depth at which water in the soil typically freezes — to protect the posts from heaving up during freezing weather. A concrete footer is a common choice, but you can also use piers. Both types require a mix of concrete and gravel to set the posts.
Before you start constructing the deck’s frame, consult your blueprints and local building inspection office to determine load requirements for the structure. This information will help you decide the size of beams and joists, and the dimensions for the decking itself. For example, a small deck might require 2 x 6 lumber, while a larger deck might need 2 x 10 or even 2 x 12 lumber.
After the posts and footings are set, you will build the deck’s frame with joists. Depending on the design of your deck, you might need to install a ledger board that attaches the deck to your house. The ledger will provide the support for the deck’s surface, so it is important to attach it correctly. The level at which the top of the ledger rests should be the same as the level where you will mount the joists.
When you start building the joists, it’s best to work with a partner. This will make the job go faster and ensure that the joists are built evenly. It’s also important to work with lumber that has been treated for exterior use. Otherwise, it will rot more quickly.
When you’ve finished framing the joists, you can start laying decking boards. Usually, these are 1 x 4 or 1 x 6 pieces of lumber, but you can also choose synthetic decking materials. You will need to install stairways and railings as well, depending on how high the deck is off the ground and code requirements.
Sprinkler Repair – Detecting and Fixing Sprinkler Leaks
Maintaining a healthy, green lawn is a top priority for many homeowners. It adds to the curb appeal of a property and helps raise its potential selling price.
Sprinkler Repair Harrisburg PA can fix issues like clogged nozzles, broken sprinkler heads, and faulty watering schedules. Professional irrigation technicians will inspect the system and diagnose the problem.

Leaks are one of the most common sprinkler problems. They waste water, decrease system performance, and cause uneven plant coverage. Leaks can be caused by many different things, including clogged nozzles, broken heads, and valve issues. Detecting and fixing leaks is crucial, as they can lead to costly water bills and overwatering.
The most common cause of sprinkler leaks is faulty sprinkler valves. These valves are responsible for controlling the flow of water to each zone in your yard. They can malfunction due to worn solenoids, debris blockage, or other issues that affect their electrical connections. Signs that a valve is going bad include uneven watering, low water pressure in a particular zone, or water continuously leaking from a specific sprinkler head. To fix the issue, turn off the water supply to that zone and disassemble the valve, identifying and replacing the diaphragm.
Another common reason for sprinkler leaks is broken pipes. These can occur for a variety of reasons, such as tree root intrusion or freeze damage in winter. Unlike a clogged pipe, which can often be cleared without digging, broken pipes need to be removed and replaced. When this occurs, it’s best to hire a professional to ensure the job is done properly.
Before making any repairs, it’s important to shut off the water supply to the irrigation system. This prevents excess escape of water during the repair process and helps minimize damage to your landscape. It’s also essential to have the right tools for the job, such as a garden trowel, Phillips screwdriver, pliers, and a bucket. A spare valve diaphragm, Teflon tape, and waterproof wire connectors are helpful as well. Lastly, a good working area is key to performing a successful repair.
Regular preventative maintenance can help keep your sprinkler system running smoothly and efficiently. The first step is to inspect the entire system at least once a year. A quick walk through the yard can reveal a lot of information about your system, including small leaks that may be difficult to notice. It’s also a good idea to monitor water usage, as any changes can indicate a problem.
Broken Pipes
The ground thaws and sprinklers are turned on again in spring, which means water leaks and other issues are more likely to occur. It is easy to find and fix these problems if you know what to look for and have the right tools and supplies. Consistent maintenance will also help prevent these problems and extend the life of your system.
One of the most common and costly sprinkler repair issues is broken underground pipes. The pipes carry water through the irrigation system and provide the necessary pressure to activate sprinkler zones. If you notice puddles or other wet areas in your yard, these are signs of a leak in the pipe. You can also check the system’s pressure with a water pressure gauge.
To locate the break and expose it, first turn off the water supply. Then use a shovel or tubing cutter to dig around the area of the broken line to expose it. Once you have the broken section exposed, cut it off and remove it using a tube cutter. Then use couplings and band clamps to connect the new section of pipe and secure it.
If the pipe is only cracked, you can use duct tape to repair it. Place a piece of duct tape on the side that is damaged, and then put another on the section of the pipe next to it. This will bridge the gap and allow water to flow through unaffected pipe.
For larger breaks, you’ll need to cut off the damaged section of pipe and replace it. This can be a bit tricky because of the underground location, but it is possible. If you have a replacement pipe section, it’s important to cut it the same length as the old one. You can then use a slip coupling to connect the two sections together, and reattach the band clamps.
You can also try heating the pipe with a hand torch to make it more malleable. This can help you get the coupling on more easily. Once the new section of pipe is installed, you can backfill the area and reinstall the lawn grass.
Faulty Electrical Connections
If you’re unable to get your sprinklers to turn on, there may be electrical issues. Always turn off the power to your irrigation system at the circuit breaker before working on it. This will prevent electric shock and possible damage to the system components.
Start with the controller or timer—the brains of the sprinkler system. If it isn’t turning on, check for a blown fuse or a faulty wire connection. Also, make sure the transformer is providing the proper voltage. A multimeter can be used to verify the continuity of the wiring.
Loose or corroded connections can disrupt the flow of electricity to solenoids and zones, impacting the watering schedule and spray pattern for certain areas of the lawn. The best way to avoid these problems is to regularly inspect your irrigation system and use waterproof wire connectors rated for outdoor use.
Sprinkler valves are responsible for sending water from the main line to various regions in the yard. If they are leaking or damaged, it can affect the entire lawn. Oftentimes, you can find signs of valve problems such as dry patches in the yard or uneven water pressure.
Valves can become clogged with dirt, leaves, or debris, which can reduce the flow of water and cause misdirection. You can remove debris and clean clogged heads and filters to restore water flow. You can also install a pressure regulator to maintain balanced and efficient water distribution.
A backflow device prevents contaminated water from returning to your home’s water supply. It can also affect your sprinkler system’s operation, so it is important to routinely check it for problems.
If you have any concerns about your sprinkler system or notice a problem, it’s a good idea to call a professional sprinkler repair technician in Toledo. They can identify and fix the issue, helping you save money on costly repairs. Regular inspections and basic repairs help keep your lawn healthy year-round. These simple steps can help you avoid expensive irrigation repairs and ensure your lawn receives the right amount of moisture. The professional will check the system for leaks, clogged nozzles, and improperly operating zones. They will then repair or replace the necessary components and test the system to ensure it is functioning properly.
Faulty Solenoid
A sprinkler valve solenoid is a plastic piece with electrical wires controlling how much water comes out of the sprinkler system based on the amount of electricity it receives. One broken solenoid could completely stop your entire sprinkler system from working. The good news is that sprinkler valves are relatively easy to troubleshoot and repair if you know what to look for.
The main problem with a valve solenoid is that it can become stuck open or closed. This can prevent the valve from turning on when commanded or from staying on once it is turned on. To fix this, you will need to turn off your sprinklers and locate the faulty solenoid. You can then unscrew it, let water pass through, and test if it is stuck in the open or closed position. If it is still stuck, you will need to disassemble the valve and remove any small rocks or debris from the diaphragm. This should help it close again.
Another common problem is that the solenoid keeps holding back, often as a result of not receiving enough current to trigger its mechanical movements. This can lead to a variety of symptoms including leaks and reduced water pressure.
If you have an ohms meter, you can check whether your valve is getting enough power to activate by connecting the ohms meter to the terminals on the solenoid itself. If the meter reads out of range, it means that the solenoid isn’t receiving sufficient current and should be replaced.
While you should never troubleshoot electricity without proper training, a few things that you can try at home include flipping the circuit breaker switch to see if this makes any difference. You can also clean your solenoid and flush it with water, but any mechanical issues should be handled by a professional.
As with any piece of equipment, your sprinklers will need regular maintenance and inspections to ensure they are functioning properly. This will help you avoid costly repairs and keep your lawn healthy and green throughout the year. If you do experience any problems with your sprinklers, contact a professional to help you get them fixed quickly and easily.
Advantages of 3D Printing
3D Printing allows manufacturing companies to move from a digital design to a physical prototype quickly. This speeds up the production process and can lead to a better quality product.
Businesses can also print spare or replacement parts on demand. This reduces inventory costs and cuts warehousing expenses. Contact 3D Printing Phoenix AZ now!

3D printing costs can be significantly lower than traditional methods when comparing material and production costs. While CNC machining and injection molding require tooling, 3D printers do not and therefore do not have the same overhead.
Furthermore, a number of different 3D printing processes exist, each with their own benefits and drawbacks, so it’s important to select the best technology for your needs. Fused deposition modeling, for example, builds ASA faster than ULTEM 9085 resin and offers a higher resolution, while laser-based processes like Material Jetting offer lower cost parts with better mechanical integrity. Support structures also play a role in determining price, so selecting a design that utilizes fewer supports reduces costs. For instance, choosing a build orientation that saves on ridge-forming layers also cuts costs.
Similarly, reducing the amount of part components can drastically cut overall manufacturing costs. For example, GE reduced the number of parts in their General Electric Catalyst turboprop engine from 845 down to just 11. This helps improve the engine’s performance and durability, while lowering the fuel consumption and carbon emissions that can impact the environment.
Another way that 3D Printing can be more cost-effective than traditional manufacturing is by eliminating the need for customised moulds. This can save time and money by avoiding the long lead times involved in getting tools manufactured.
Compared to subtractive manufacturing techniques, 3D Printing uses less materials due to its layer-by-layer build process. This also makes it possible to create complex geometries that would be impossible or expensive with other production methods. For example, a traditional method of reducing the weight of a product requires removing material from the original block, which often results in excess waste. With additive manufacturing, this is not the case. By adding complexity to a design, the printer can produce lightweight structures that do not sacrifice strength or quality.
Faster
With rapid prototyping and short production times, 3D Printing allows businesses to get their products to market faster than traditional manufacturing methods. In addition, keeping the process in-house can reduce risk and maintain confidentiality for sensitive or proprietary designs.
As a result, the technology has found a place in virtually every industry — including construction and education. For example, architects are using it to construct entire buildings while schools are bringing hands-on learning into the classroom by printing dinosaur bones and robotics parts. 3D printers are also being used in medicine to produce medical models and tools, as well as by manufacturers for jigs and fixtures.
The speed of 3D Printing varies depending on the type of machine and how it’s configured. An industrial fused deposition modeling (3D FDM) printer, for instance, can produce items at speeds of 100 mm per hour while an industrial stereolithography (SLA) 3D printer constructs pieces using liquid resin at up to 500 mm per hour.
Another factor that affects 3D printing speed is the layer thickness and surface finish of an object. Thicker layers take longer to dry, and a smooth surface may require additional post-processing steps.
When it comes to accelerating the 3D printing process, there are several hardware and software adjustments that can be made without compromising print quality or accuracy. For example, reducing the infill of an item can speed up the process while maintaining the strength of the print.
However, it’s important to remember that the trade-off for increasing print speed may be a decreased quality of the final product. It’s important to experiment with different settings and find a balance that meets your specific needs.
Lighter
3D Printing is a manufacturing process that builds up layers of material to create an object. This allows engineers to create objects with complex geometries that would be difficult, if not impossible, to produce using traditional techniques. It also enables them to reduce the weight of their designs without sacrificing strength and durability. This has a huge impact on cost and energy efficiency.
Most 3D printers use a gooey liquid called a resin as their “ink.” Light triggers the resin to harden, creating a new layer every second or so until the object is complete. The resins are often made from plastics or metals. Unlike traditional inks, these liquids can be made with a wide range of materials, making them more versatile. They can even have properties like thermal conduction and magnetism.
The resins used by 3D printers contain photosensitive molecules and dissolved oxygen. Light activates the photosensitive molecules, depleting the oxygen in the printed area. The resulting voxels are then formed by a combination of chemical and physical processes. Increasing the number of voxels printed per time requires more and more light power.
Researchers at Michigan Technological University have developed an ink for 3D printers that could replace epoxies. The ink is a polymeric nanomaterial. The ink contains a combination of polymers, metals and semiconductors. It can print flexible or opaque objects, and it can be used to keep cracks too tiny to see from forming in aeronautical equipment and medical devices. It can even double as electrical wiring.
The ink has the potential to reduce the weight of many products by up to 80 percent. It could also be used to make medical implants and other parts with a high strength-to-weight ratio. It can also improve fuel efficiency and emissions reductions by reducing the weight of aircraft and automotive components.
More Versatile
Unlike traditional manufacturing methods that require a block of material or a mold, 3D Printing builds objects by stacking and fusing layers of raw materials. This allows for more complex geometries and a wider range of materials.
Plastics are one of the most popular printing materials, ranging from low-cost options like PLA to high-performance, tough-to-break ones like carbon fiber composites. These materials are incredibly versatile and ideal for many applications. Metals are also increasingly used in industrial settings for their strength, durability and thermal properties. With processes like direct metal laser sintering (DMLS), selective laser sintering (SLS) and electron beam melting (EBM), metal prints can rival the performance of standard manufactured parts.
Beyond prototyping, the versatility of 3D Printing is enabling organizations to manufacture spare or replacement parts on demand. This eliminates the need for a large inventory and enables companies to reduce overall warehousing costs. It also promotes a more sustainable business model by reducing inventory waste and eliminating the need to ship items across the country or world.
With the rise of personalization and customization, 3D Printing is allowing consumers to design and print products that are made just for them. Whether it’s footwear, jewelry or household goods, the ability to customize these products on-demand is opening up new avenues for businesses to create innovative products and services.
The medical industry is using 3D Printing to produce made-to-measure implants and devices that can be quickly printed from a digital file matched to a patient’s body scan. The automotive industry is also leveraging this technology, from accelerating prototype production to reducing manufacturing times and cost through the use of lightweight materials in vehicles. Other industries are utilizing 3D Printing to create bespoke tools, jigs and fixtures.
Customizable
Unlike traditional manufacturing, which relies on standardized molds to churn out identical products, 3D Printing allows for highly customizable end-use parts. Using materials such as polymer, which can be easily modified, designers can create prototypes with unique shapes that would have been impossible to produce with traditional techniques. This flexibility in design can lead to innovative solutions and a more user-centric product.
It also enables businesses to make changes faster and easier, which reduces design iteration time and saves money. This is why some companies use 3D printers to print end-use parts directly on demand. It also eliminates the need to maintain large inventories and slashes storage costs, while increasing customer satisfaction.
Manufacturers can also customize specialty parts to specific needs. For example, they can build a part with a unique shape to fit into a limited space or make it stronger for its intended purpose. This level of personalization can increase customer engagement, boost brand loyalty, and differentiate a business in a competitive marketplace.
Additionally, 3D Printing is environmentally friendly and can be used to create a wide range of durable and strong materials. It also teaches valuable skills, including iteration, prototyping, and problem-solving. This makes it an ideal tool for education, fostering creativity and helping students develop critical thinking and attention to detail.
Despite its many benefits, 3D Printing is not without its limitations. The technology is still in its early stages, and it may not be suitable for all applications. However, its future looks bright, and its transformative capabilities are transforming the way we manufacture things. In fact, some experts have even coined the term “4th industrial revolution” to describe its impact on how industry manufactures and improves products.
A Guide to Driveway Paving Materials
Having the right information about Driveway Paving can help homeowners save time, money, and stress down the road. This guide to the different types of paving materials for driveways will assist you in choosing the best option for your home and family!
Concrete is one of the most popular choices for new paved surfaces. It’s long-lasting, affordable, and versatile. Contact Driveway Paving Charleston SC now!
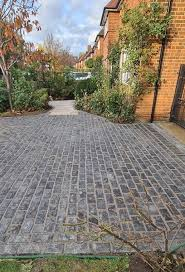
Pavers are a popular choice for driveways and patios due to their durability, flexibility, versatility and aesthetics. They are available in a wide range of sizes, shapes and colors to fit any home style or landscaping design. They also come in a variety of paving materials, such as concrete pavers, brick pavers and natural stone pavers. They can be installed over a base of gravel or sand, which helps them to be permeable and reduce the risk of weed growth.
Driveway pavers are thicker than patio pavers and can withstand the heavy weight of cars and trucks. They can also be laid in different patterns to accommodate the curves and slopes of a driveway. This allows them to withstand the stress of twisting and turning tires as well as the weight of vehicles without cracking or shifting.
If you are interested in installing a paver driveway, it is important to hire a professional installer who has experience with this type of project. The contractor should start by prepping the area for paver installation by creating a base of gravel and sand, which helps prevent weeds and promote drainage. Then the pavers are placed one-by-one in your chosen pattern and sand is added to help them stay in place. A paved driveway is not complete until it is topped with a sealant to protect the surface and keep it looking like new.
The most common option for a driveway paving material is asphalt. This is because it is cost effective and durable, and it can be installed quickly. It is a good option for homeowners who are on a budget but want a stylish and functional driveway. However, asphalt can be prone to cracking under the pressure of vehicles and weather, so it is best to consider other options if possible.
Another popular option is tar & chip, which uses a layer of hot asphalt on the ground and then loose stones are spread over it to create a textured appearance. This is a more affordable option than asphalt paving and is easy to maintain. It is also a great choice for rural driveways, as the loose nature of the chips makes it easier to clear snow and dirt from the road.
Concrete
Concrete is the most popular material for driveways, offering a sleek and customizable look that can boost curb appeal and add value to your home. This material is also extremely durable, able to withstand heavy vehicles and resist cracking over time.
When compared to asphalt, concrete is typically less expensive and is more versatile in terms of design options. You can use a variety of color and texture treatments to create a unique surface that complements your landscape design or architectural style.
The downside to concrete is that it can be susceptible to cracking if not properly installed or maintained. To prevent cracking, your contractor should form expansion joints (grooves) throughout the slab to allow for shifts in temperature and ground movement. In addition to preventing cracking, these joints help minimize random cracking that can detract from the overall appearance of the concrete.
If you’re concerned about the cost of a concrete driveway, keep in mind that it can be made more affordable by choosing a lighter shade or even a recycled product. Lighter colored concrete is also more reflective and can save energy by reducing the heat-island effect.
Concrete is relatively easy to install, although it can be a labor-intensive project for the homeowner. It requires a packed sub-base layer, the construction of wooden forms to hold the liquid concrete, and careful tooling and smoothing once the concrete has set.
In addition, you can choose between a hot mix and cold mix concrete for your driveway. Hot mix concrete is heated before application, which reduces emissions and fuel consumption. Cold mix, on the other hand, does not require heating before applying and is a good choice for patching and repair work.
When considering your paving materials, be sure to think about the load requirements of your vehicle and how often you will be using your driveway. Your paving specialist can help you determine the thickness that will best accommodate these conditions and prevent damage to your vehicle or your pavement. They can also advise you on drainage issues and how to slope your driveway to direct rainwater away from your property.
Asphalt
Asphalt is a common driveway material that can offer several benefits for homeowners. It is a cost-effective option compared to concrete and has a faster installation time. It also provides a smooth, durable surface that can withstand heavy vehicle traffic and weather conditions. Its dark color also helps to hide oil stains and rust spots, making it easy for homeowners to maintain.
Asphalt driveways are less likely to crack than concrete, particularly in freezing temperatures. They are also more flexible, which helps minimize damage from the weight of snowplows and road salt. However, like all paving materials, it requires regular maintenance and repair to extend its lifespan.
An adequately paved driveway can significantly increase a home’s curb appeal, which is a key factor in a potential buyer’s decision-making process. This is especially important in Southern California, where a well-maintained driveway can make your property stand out and increase its value.
To help ensure the longevity of an asphalt driveway, it is critical to understand the underlying causes of damage. While it is not uncommon for asphalt to develop cracks over time, it is possible to prevent these problems by identifying the cause and taking corrective action. These steps include ensuring that the driveway has proper grading and drainage, avoiding excessive heat and sun exposure, and repairing damage early on.
An asphalt driveway that is well-maintained can last up to 20 years before it needs a resurfacing or patching job. In addition, regular sweeping and periodic sealcoating can prevent moisture from damaging the asphalt surface. If you are considering a new driveway surface, be sure to consult with an expert paving contractor for guidance on choosing the right material and a professional paving crew that will ensure your project is completed properly.
Gravel
Gravel is a popular choice for driveways because it is cheap, durable and looks great. It comes in a variety of colors and textures, so homeowners can choose the type that best suits their aesthetic preferences. It is also versatile, as it can be used in different landscape designs and to create drainage solutions. However, there are some important things to keep in mind when choosing gravel for your driveway paving project.
One major consideration is that gravel can easily become dirty if it gets wet, so you will need to spend more time cleaning your driveway. It is also prone to rutting and can be unstable in extreme weather conditions. Additionally, it may be difficult to get rid of ice and snow. Using salt or sand can help, but these products can leave an undesirable stain on your driveway.
Another concern is that gravel can be abrasive, so you will need to use a strong, commercial grade grading machine when installing it. Fortunately, this is not usually a problem for most people, as it will only affect the top layer of the material. However, if you are concerned about the impact on your driveway’s structure, you may want to consider other options for driveway paving.
There is a lot to think about when it comes to driveway paving, and you should always make sure that you are making the right decision for your home. By considering the different options available, you can ensure that your driveway will be safe and comfortable to drive on for years to come. If you have any questions or concerns about the process, be sure to contact a professional for more information.
Drywall Repair Basics
From small dents and abrasions to large holes, any physical damage to drywall will require some form of repair. Often, all that is needed are a few small touches of spackle and a smoothing tool followed by repainting to hide the repair work.

If the damage is more severe, you may need to replace a section of drywall. Getting this right will require some preparation, but it can be done! Contact Drywall Repair Phoenix for professional help.
For minor blemishes like small holes or nail holes, you can often simply apply a touch-up of paint to the area and the damage will disappear. For larger areas, however, a drywall patch kit is often necessary to restore the wall’s appearance. In either case, it is important to properly prepare for the repair and have the proper tools available to ensure a quality job.
A few key items to have on hand for drywall patching are a stud finder and a carpenter’s square. A stud finder will help you locate the center of the nearest stud to the damaged area, while a carpenter’s square will help you mark a straight line to follow with your drywall saw. Once you’ve marked the line, cut it with your drywall saw to create a square hole that is at least an inch wide.
Next, use a wire mesh patch to cover the hole. Attach the patch to the wall with a putty knife and fill it with spackle or joint compound. Apply multiple layers, allowing each layer to dry completely before applying the next. Be sure to feather the edges to help the patch blend in with the rest of the wall.
Finally, finish the patch with a few light coats of drywall compound and sand it down once again, being careful not to go too far into the corner bead. Once the patch is sanded, you’ll be ready to prime and paint.
For dents or scratches in the drywall, you can usually simply apply a few layers of drywall compound and smear it to make it flush with the wall. Be sure to smooth the compound with a putty knife designed for drywall, as it’s much easier than using wood putty on the surface.
Larger dents or holes in drywall can be more difficult to fix, but it’s definitely possible. You’ll just need to prep differently. Start by cutting a piece of new drywall that’s a few inches bigger than the hole. Place it over the hole and trace it lightly with a pen or pencil.
Crack Repair
A drywall crack is a common problem that can occur in almost any home. Drywall is a sturdy material, but the stresses of life can cause it to develop a hairline crack that needs to be repaired quickly to prevent it from worsening.
There are several ways to fix a drywall crack, depending on the size and severity of the crack. For small cracks, you can use a drywall patch kit to fill in the crack and blend it into the existing wall. This is a quick and easy solution that will make the damage practically invisible when it’s finished.
Larger cracks will require a bit more work to repair. First, you will need to clean the area around the crack and remove any dust or debris that has accumulated. This will help the drywall compound adhere properly. Once the area is ready, you will need to sand the drywall surface smooth and apply a new coat of drywall compound. After the new drywall compound has dried, you will need to sand it again to get it completely smooth.
If the crack is at a seam, you can use a utility knife to widen the gap between the drywall sheets where the crack appears (Image 1). Then, you can fill the crack with a thin layer of spackle and smooth it out using a putty knife. You can also cover the crack with self-adhesive fiberglass drywall tape to strengthen the joint and prevent future cracks.
If you have a larger crack, you will need to construct a new piece of drywall to replace the damaged section (Image 2). This requires a little more construction than just filling in a hole. You will need to cut a piece of drywall to the size of the damaged section and install it on the wall. This will require a drywall saw and some skill.
It’s important to carefully measure the length and width of the damaged drywall before cutting it out. It’s also a good idea to trace the new piece of drywall onto the old drywall before cutting so you can ensure that the patch will be the right size when it’s finished.
Patching Large Areas
While minor holes and nail pops are relatively easy to patch, larger areas require a more in-depth repair procedure. It’s important that the drywall repair addresses the root cause of the problem so it doesn’t happen again. For example, a small hole or crack might indicate slight settling or moisture damage, while larger areas may suggest structural issues.
For drywall repairs in these larger areas, you’ll need a drywall patch kit that includes all the necessary tools and materials for the job. The first step in this process is to remove any loose and damaged materials around the area, then clean the wall and prep it for new drywall. Once the surface is ready, you’ll need to add a backing board (often a scrap piece of lumber cut about 2-4 inches longer than the patch) so the patch can be screwed into it.
Once you’ve added the backing, you can measure and cut a piece of drywall to fit the hole. Once it’s cut, you can use a drywall knife to smooth the edges and apply joint tape. Once the joint tape is in place, you can apply a coat of drywall compound. Let the drywall compound dry and sand it smooth before painting.
It’s also a good idea to prime the patched area before repainting. This will help ensure the new paint adheres and helps the patch blend in with the existing surface.
Depending on the severity of the damage, you may want to call in a professional drywall contractor to help with the job. Large areas and extensive damage can be tricky to repair and it’s often better to leave these types of projects to the professionals.
If you’re in the market for a quality drywall service, contact Sierra View. Our team of experienced technicians can handle any drywall repair or replacement job that you have, large or small. Get a quote from us online today or call us at 801-895-8177 to learn more about our services. We’re proud to offer competitive pricing and outstanding customer service!
Drywall Replacement
Drywall is a versatile building material that can be used to create walls and ceilings. Known by many names, including plasterboard and gypsum board, it is an important component of homes and buildings. It’s a cost-effective and easy way to construct interior walls, and it provides a durable surface that can be painted. Like any building material, drywall is susceptible to damage over time. Cracks, dents and other imperfections can occur due to structural settling or moisture infiltration, and they can detract from the aesthetic appeal of a space. Depending on the severity of the damage, drywall repair may be a simple DIY project or require the services of a professional.
Dry wall repair begins with assessing the extent of the damage and determining what tools and materials are needed to make the necessary repairs. For small holes and dings, you can use spackle or joint compound (also called “mud”) to fill in the blemishes. To prevent future drywall damage, it is important to inspect your walls regularly and to address any issues as soon as possible. Other preventive measures include regular painting and maintaining proper humidity levels to keep drywall mold-free.
A drywall patch kit includes all the tools you need to complete small drywall repairs, including a stud finder, carpenter’s square and a utility knife. Once you have the necessary materials, follow the instructions in the patch kit to prepare the area for a repair. First, use the stud finder to locate the center of the nearest stud on either side of the hole, and mark it with a pencil. Next, cut away the damaged area of drywall with the utility knife, using care to not disturb the surrounding drywall.
Once the area is prepared, apply a thin layer of spackle or joint compound to the patch and surrounding areas. Smooth the patch, and feather the edges of the patch into the existing wall to ensure a seamless blend. Once the patch has dried, sand until it is smooth and ready for paint.
While repairing minor dents and holes in drywall is relatively straightforward, larger holes or patches can be more complex. In these cases, it is often best to leave the work to a professional. Professionals can not only repair the damaged drywall, but they can also identify and correct any problems that might be causing the drywall to deteriorate.
Stucco Repair: What Is Stucco Repair and Why Is It Necessary?
Stucco Repair Charleston SC is repairing damage or deterioration to existing stucco surfaces. The method includes a thorough inspection by stucco remediation professionals to identify the extent of the problem and any underlying issues.
Once these underlying issues are addressed, the rest of the process can be completed. This includes mixing stucco according to manufacturer instructions and applying it to cracks or holes.

Stucco is a popular material for exterior and interior walls due to its durability, low maintenance requirements, and striking appearance. However, as with any other wall material, it can suffer from cracks and holes that require attention. When these problems appear, they must be repaired promptly to avoid further damage and costly repairs.
Hairline cracks in stucco are narrow fractures that run 1/16th of an inch or less in width, and they often have a wispy or “hairlike” appearance. These types of cracks are typically caused by improper mud mixture, new home settlement, seismic movement or foundation settlement. These cracks aren’t considered structural and can be repaired with a simple patching compound.
Larger cracks or holes in stucco are more serious and may indicate a structural problem with your home’s foundation. Often, these cracks will develop at the intersection of vertical walls or at the upper corners of window and door frames. They also can occur at the joints between wood framing and concrete or brick masonry. These cracks are not only unsightly but they allow moisture and water to penetrate the wall and cause significant damage that requires costly repair.
To repair larger cracks in stucco, first use a cold chisel and hammer to widen the crack at least a quarter inch. Make sure that the crack is widened at the base and on both sides of the hole. This will help to ensure that the patching compound is able to fill and seal the crack completely. Next, clean the area with a wire brush and prepare it by removing any loose debris. Once the crack is prepared, apply a layer of stucco patching compound to the inside of the hole and trowel it smooth to blend with the rest of the wall surface. Allow the patching compound to dry and then paint over it using your preferred color of stucco.
To fix smaller cracks, first use a putty knife or trowel to apply a thin layer of stucco patching compound over the cracked area. Apply a piece of stucco wire mesh over the compound to hold it in place. After the patching compound dries, use a sanding block to smooth it and prepare it for painting.
Water Damage
Water damage to stucco isn’t just unsightly; it can be a sign of bigger issues. Moisture in your stucco can deteriorate the integrity of the material and allow mold to grow, leading to further structural problems for your home. If you see signs of moisture intrusion in your stucco, call a professional right away to address the problem before it gets worse.
Often, the first indication of moisture intrusion is a small crack in the stucco. These can range from thin hairline cracks to larger fissures. If you find cracks, take note of their size and location on the wall. Look for discoloration as well, as yellowing or brown staining may indicate water seepage. Also, be on the lookout for loose or bulging stucco, which can indicate separation between the stucco and its wire lath support. Finally, listen for a hollow sound when you tap on the surface of the stucco. This sound suggests that the stucco is delaminating and is allowing moisture to penetrate underneath.
Once moisture seeps into your stucco, it can cause significant damage in a very short amount of time. A small crack can become a major problem in just a few weeks if left untreated. That’s why it’s important to check for these 7 signs of moisture in your stucco and bring in a professional for a quick repair if you notice any.
A professional can use an elastomeric or premixed stucco patch to fill the crack and smooth it out. The patch will then be textured to match the existing texture and blend in with the rest of the stucco. Using coloring pigment in the mix can help achieve a color that matches well, especially if the crack is very noticeable.
In some cases, a major repair may be required to restore the integrity of the stucco wall system. This may involve replacing the wood work, wire lath and sheeting in addition to repairing the stucco. This is a job best left to professionals who do this type of work on a regular basis.
Stains and Discoloration
Stucco provides a protective barrier against the elements, but like all materials, it is susceptible to damage. Fortunately, the vast majority of the time, this damage is not structural in nature and can be corrected rather easily. In fact, oftentimes, stains and discoloration can be avoided entirely by regular cleaning and care.
Staining and discoloration in stucco can be caused by a number of different factors, but the most common cause is dirt or pollution washing onto and staining the surface. Depending on the type of stain and how it is caused, a variety of solutions can be used to remove it. For example, organic borax or Oxiclean might work for oil based stains, vinegar might be effective for mildew or very dilute muratic acid may be helpful for more stubborn problems. Just remember to test the solution on a small area before applying it to an entire wall!
It is also important to note that any time stucco is cleaned, it is vital that it be thoroughly rinsed afterwards. Failure to do so can allow water and contaminants to enter cracks in the stucco, causing mold and mildew. If a homeowner attempts to clean their own stucco and fails to rinse it properly, this can lead to the need for extensive and expensive repairs or replacement.
If a homeowner notices any dark spots on their stucco, it is crucial to hire a professional for a thorough inspection as soon as possible. Stucco contractors can look for any cracks or breaks in the structure that might be allowing water to seep in, which could eventually cause serious and permanent damage to the home.
Additionally, if there are bushes or a tree growing near to the stucco of a home, it is possible that their roots are contributing to the moisture issues in the house. The sugars released by the trees and bushes can fuel mold and mildew growth by creating a tiny microclimate around the walls that raises humidity levels. Stucco contractors can check for these types of problems and recommend any necessary treatments.
Mold
Mold damage in stucco can lead to rot, further cracking and deterioration of the wall material, as well as health issues for home occupants. It is important to inspect and regularly clean stucco surfaces to spot and address mold growth and other signs of moisture damage early on.
If you suspect there is a serious mold problem in your stucco, make sure to protect yourself by wearing gloves and a mask. First, remove as much dirt and debris from the surface as possible by brushing with a stiff-bristled brush. Regularly hosing off your stucco walls with a garden hose can also help to keep them dry and prevent moisture damage from growing.
In cases where mold stains persist, you may need to use a cleaning solution. You can find mold removal solutions that are safe for use on stucco by combining equal parts water and oxygen bleach (bleach that does not contain chlorine). Spray the solution onto the affected areas of your wall and scrub with a stiff-bristle brush to break down and remove any mold. You can rinse the area with clean water afterward to ensure all of the mold and stains have been removed.
If the mold continues to grow or musty odors continue to be present, it is time for professional remediation and a stucco repair. Extensive cracks and holes can also be the cause of severe mold problems in stucco and require expert attention from a contractor.
While there are DIY kits available for small repairs to stucco, it is best to have a professional handle any major structural damage to your home’s exterior. Leaving damaged stucco unchecked can allow moisture to seep behind the material and further erode it, as well as wood framing and windows. Water that can’t escape your home’s exterior will ultimately deteriorate the materials and increase the cost of future repairs. A professional can conduct a moisture inspection to determine the full extent of the damage and prevent costly repairs.